
The Bluetooth-Controlled LED Project is an exciting and accessible introduction to wireless communication and Arduino programming, perfect for beginners and hobbyists alike. This project allows you to remotely control an LED using a smartphone app via an HC-05 Bluetooth module, showcasing how simple components can create an interactive system. By sending commands like "ON" or "OFF" through the app.
The Arduino processes the data and controls the LED accordingly, demonstrating the basics of serial communication, digital output control, and Bluetooth connectivity. Not only is this project a great way to learn foundational electronics and coding skills, but it also opens the door to more advanced applications, such as controlling multiple devices, integrating voice commands, or even building smart home systems.
Whether you're new to Arduino or looking to expand your knowledge, this project is a fun and practical starting point for exploring the endless possibilities of wireless control and automation.
Components Required
- Arduino Uno
- HC-O5 Bluetooth Module
- Light Emitting Diodes (LED)
- 220Ω Resistor
- BreadBoard
- Jumper Wires
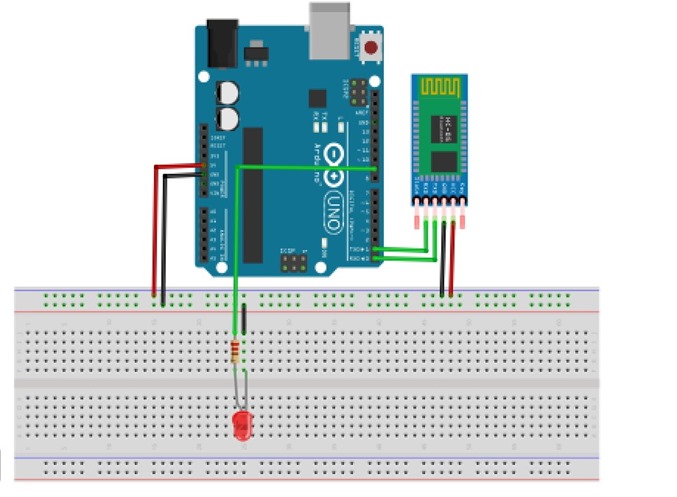
Circuit Diagram
1. Connect the Bluetooth Module:
- VCC → 5V on Arduino
- GND → GND on Arduino
- TX → RX (Pin 2) on Arduino (use a voltage divider if needed)
- RX → TX (Pin 3) on Arduino
2. Connect the LED:
- Anode (longer leg) → Digital Pin 9 via 220Ω resistor
- Cathode (shorter leg) → GND on the Arduino
Code
#include <SoftwareSerial.h>
SoftwareSerial BTSerial(2, 3); // RX, TX
const int ledPin = 9;
char data;
void setup() {
pinMode(ledPin, OUTPUT);
BTSerial.begin(9600);
}
void loop() {
if (BTSerial.available()) {
data = BTSerial.read();
if (data == '1') {
digitalWrite(ledPin, HIGH);
} else if (data == '0') {
digitalWrite(ledPin, LOW);
}
}
}
OBSERVE FUNCTIONALITY
- Pair your smartphone with HC-05 in Bluetooth settings. (Password: "0000" or "1234" or "123456")
- Open a Bluetooth terminal app and connect to HC-05.
- Send '1' → LED turns ON.
- Send '0' → LED turns OFF
Possible Errors and How to Fix Them – Bluetooth-Controlled LED
- Bluetooth Module Not Pairing with the Phone
Cause:
- Incorrect wiring of the HC-05/HC-06 Bluetooth module.
- Bluetooth module is in AT mode instead of data mode.
- Phone’s Bluetooth is not compatible or already paired with another device.
Solution:
- Check password
- Ensure VCC → 5V, GND → GND, TX → D2, RX → D3 (with a voltage divider if needed).
- Restart both Bluetooth module and phone before pairing.
- Use a Bluetooth terminal app to verify the connection.
2. LED Not Responding to Commands
Cause:
- Wrong baud rate setting for the Bluetooth module.
- Arduino not correctly reading serial data.
- LED wiring issue.
Solution:
- Ensure the Bluetooth module is set to 9600 baud rate (for HC-06) or 38400 baud (for HC-05 in default mode).
- Add Serial.print() commands to debug if data is being received.
- Check LED wiring (Anode to D8, Cathode to GND, with a 220Ω resistor).
3. Random or No Response from Bluetooth Module
Cause:
- Weak Bluetooth signal or interference.
- Power supply instability.
- Serial communication conflict.
Solution:
- Keep the phone within 5-10 meters of the module.
- Use a stable 5V power source for the Bluetooth module.
- Ensure the TX/RX pins are not shared with other modules.
Conclusion
The Bluetooth-Controlled LED system enables wireless LED control using a smartphone and an HC-05/HC-06 module. This project can be expanded to control multiple LEDs, appliances, or servo motors for home automation.