
Hey guys, this is your hardware friend, Kayode. Hope you’ve been good? Today, we’re diving into an essential skill for anyone working with Arduino: reading analog voltage.
Analog signals surround us—they vary with time, unlike digital signals that are binary (on or off). A common example is the electricity supply in our homes, which is a sine wave. Understanding analog signals is critical since they are widely used. In this tutorial, we’ll explore how to measure analog signals using the Arduino.
The Concept
The Arduino Uno is powered by the AT-mega328 microcontroller, which includes an Analog to Digital Converter (ADC). The microcontroller itself can only process digital signals, so the ADC is essential for converting analog signals into digital ones.
Key details about Arduino's ADC:
- It has 6 channels labeled A0–A5.
- The ADC is 10-bit, meaning it maps input voltages between 0V and 5V to values ranging from 0 to 1023.
For instance:
- 0V → ADC value = 0
- 5V → ADC value = 1023
In this tutorial, we’ll:
- Read an analog input from a potentiometer connected to pin A0.
- Convert the input to voltage.
- Print the results to the Serial Monitor.
Components Required
- Arduino Uno
- Potentiometer (10K ohms)
- Jumper wires
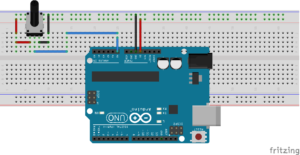
Circuit Diagram
Connections:
- Attach the center pin of the potentiometer to A0 on the Arduino.
- Connect one of the outer pins of the potentiometer to +5V.
- Connect the other outer pin to GND.
How the Arduino Reads Analog Signals
To measure analog signals, we use the analogRead() function, which reads the voltage on an analog pin and converts it into a 10-bit integer (0–1023).
This is the counterpart of the digitalRead() function, which only reads HIGH (1) or LOW (0) values.
Steps to Build the Circuit
- Place the Arduino Uno on your breadboard.
- Connect the potentiometer as per the circuit diagram.
- Upload the code to the Arduino to read and display the analog voltage.
CODE EXPLANATION
First, we start serial communication in the void setup() function
void setup() {
  // initialize serial communication at 9600 bits per second:
  Serial.begin(9600);
}
Next, read the input on analog pin 0 and convert the analog reading (which goes from 0 – 1023) to a voltage (0 – 5V) then we print out the value on the serial monitor.
void loop() {
  // read the input on analog pin 0:
  int sensorValue = analogRead(A0);
  // Convert the analog reading (which goes from 0 - 1023) to a voltage (0 - 5V):
  float voltage = sensorValue * (5.0 / 1023.0);
  // print out the value you read:
  Serial.println(voltage);
}
CODE
// the setup routine runs once when you press reset:
void setup() {
  // initialize serial communication at 9600 bits per second:
  Serial.begin(9600);
}

// the loop routine runs over and over again forever:
void loop() {
  // read the input on analog pin 0:
  int sensorValue = analogRead(A0);
  // Convert the analog reading (which goes from 0 - 1023) to a voltage (0 - 5V):
  float voltage = sensorValue * (5.0 / 1023.0);
  // print out the value you read:
  Serial.println(voltage);
}
And voila, we have successfully read the analog signal. Copy and paste the code into the IDE and open the serial monitor to see the result. Pls, let me know if you have any question.
Conclusion
By following this tutorial, you’ve learned how to measure analog signals using the Arduino Uno. This knowledge opens doors to working with sensors, potentiometers, and other analog devices in your projects.
Let me know if you have any questions, and happy tinkering!
Yours geekly,
Kayode.
Comments