
The Smart Garbage Can is a game-changing, hands-free waste disposal solution that combines practicality with cutting-edge technology to make your life cleaner and easier. At its core, an ultrasonic sensor detects when your hand approaches, measuring the distance and signaling an Arduino microcontroller to activate a servo motor, which effortlessly lifts the lid without any need for physical contact.
This touch-free operation not only enhances hygiene by reducing the spread of germs but also offers added convenience for those with mobility issues or busy hands. Powered by batteries, the system is portable, energy-efficient, and designed to fit seamlessly into any environment—whether it’s your kitchen, office, or a public space.
Its minimalist design hides the tech inside, while features like adjustable sensitivity and delayed closing ensure it works exactly how you need it to. Beyond its basic function, the Smart Garbage Can opens the door to future upgrades, from solar power to smart sensors that notify you when the bin is full. It’s more than just a trash bin; it’s a small but significant step toward a smarter, cleaner, and more efficient way of living.
Components Required
- Arduino Uno
- HC-SR04 Ultrasonic Sensor
- SG90 Servo Motor
- 9V Battery
- Bread Board
- Jumper wires
- Plastic/Cardboard Lid
- Garbage Can
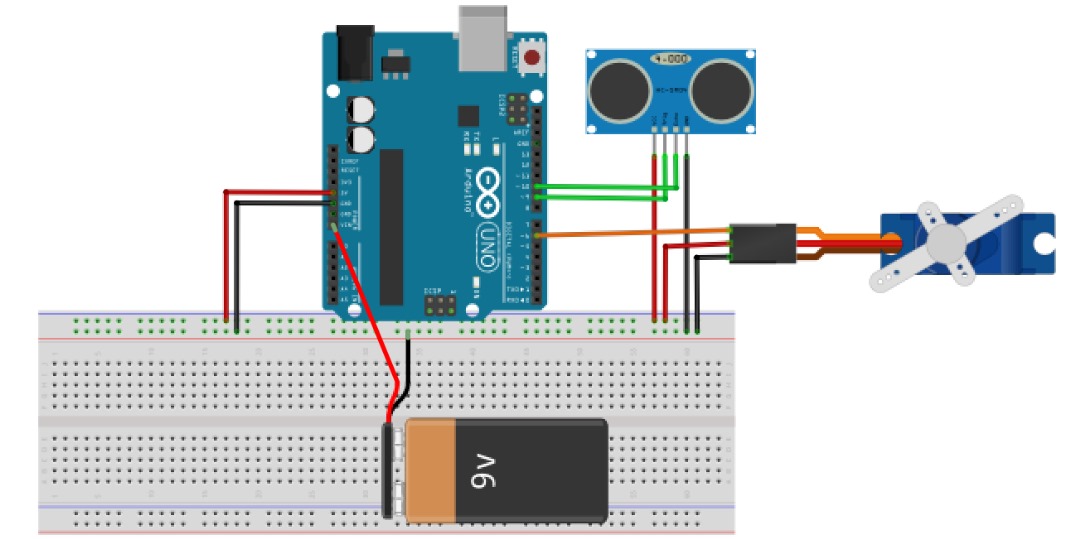
Circuit Diagram
1. Connect the Ultrasonic Sensor (HC-SR04):
- VCC → 5V on Arduino.
- GND → GND on Arduino.
- Trig (Trigger Pin) → D9 on Arduino.
- Echo (Echo Pin) → D10 on Arduino.
2. Connect the Servo Motor (SG90):
- VCC (Red wire) → 5V on Arduino.
- GND (Black/Brown wire) → GND on Arduino.
- Signal (Yellow/Orange wire) → D6 on Arduino.
3. Mount the Servo and Lid:
- Attach the servo horn to the lid securely.
- Position the servo motor at the bin’s hinge area for smooth lid movement.
4. Power the System:
- Use a 5V USB cable or 9V battery to power the Arduino.
5. Upload the Code:
- Open Arduino IDE, paste the provided code, and upload it.
CODE
#include <Servo.h>
const int trigPin = 9; // Ultrasonic sensor trigger
const int echoPin = 10; // Ultrasonic sensor echo
const int servoPin = 6; // Servo motor pin
Servo lidServo;
void setup() {
pinMode(trigPin, OUTPUT);
pinMode(echoPin, INPUT);
lidServo.attach(servoPin);
lidServo.write(0); // Start with the lid closed
Serial.begin(9600);
}
void loop() {
long duration;
int distance;
// Trigger the ultrasonic sensor
digitalWrite(trigPin, LOW);
delayMicroseconds(2);
digitalWrite(trigPin, HIGH);
delayMicroseconds(10);
digitalWrite(trigPin, LOW);
// Read the echo time and calculate distance
duration = pulseIn(echoPin, HIGH);
distance = duration * 0.034 / 2; // Convert to cm
Serial.print("Distance: ");
Serial.print(distance);
Serial.println(" cm");
// If a hand is detected within 15 cm, open the lid
if (distance > 0 && distance < 15) {
lidServo.write(90); // Open lid
delay(3000); // Keep it open for 3 seconds
lidServo.write(0); // Close lid
}
delay(500); // Wait before next reading
}
CODE EXPLANATION
First Include the Servo Library, this line tells the Arduino to include the Servo library, which provides pre-written functions to control servo motors easily.
#include <Servo.h>
Next, we define which pins on the Arduino are connected to the ultrasonic sensor and the servo motor:
- trigPin is the pin that sends a signal to the ultrasonic sensor to start measuring distance.
- echoPin is the pin that receives the signal back from the sensor.
- servoPin is the pin connected to the servo motor that controls the lid.
const int trigPin = 9;  // Ultrasonic sensor trigger pin
const int echoPin = 10; // Ultrasonic sensor echo pin
const int servoPin = 6; // Servo motor pin
We then created an object named lidServo that will allow us to control the servo motor.
Servo lidServo;
The setup() function runs once when the Arduino starts:
- pinMode() sets trigPin as an output (to send signals) and echoPin as an input (to receive signals).
- lidServo.attach(servoPin) connects the servo motor to the specified pin.
- lidServo.write(0) ensures the lid starts in the closed position (0 degrees).
- Serial.begin(9600) starts the serial monitor, which lets us print messages for debugging.
void setup() {
  pinMode(trigPin, OUTPUT);  // Set trigPin as OUTPUT
  pinMode(echoPin, INPUT);   // Set echoPin as INPUT
  lidServo.attach(servoPin); // Attach the servo to servoPin
  lidServo.write(0);         // Start with the lid closed
  Serial.begin(9600);        // Start serial communication for  debugging
}
The loop() function runs repeatedly, making the system continuously check for your obstructions and control the lid. This sends a short pulse (10 microseconds) to the ultrasonic sensor’s trigPin to start a distance measurement.
digitalWrite(trigPin, LOW);
delayMicroseconds(2);
digitalWrite(trigPin, HIGH);
delayMicroseconds(10);
digitalWrite(trigPin, LOW);
The pulseIn() function measures how long it takes for the ultrasonic sensor’s echo pin to go from LOW to HIGH. This time is stored in the duration variable.
duration = pulseIn(echoPin, HIGH);
The formula converts the echo time (duration) into distance in centimeters. Here’s how it works:
- Sound travels at approximately 0.034 cm per microsecond.
- We divide by 2 because the sound wave travels to the object and back.
distance = duration * 0.034 / 2; // Convert to cm
This prints the measured distance to the serial monitor, which is useful for debugging and understanding how the sensor works.
Serial.print("Distance: ");
Serial.print(distance);
Serial.println(" cm");
The condition for opening and closing the lid.
- If the distance is between 0 and 15 cm, it means your hand is close to the sensor.
- The servo motor moves to 90 degrees, opening the lid.
- The lid stays open for 3 seconds (delay(3000)), then closes by moving back to 0 degrees.
if (distance > 0 && distance < 15) {
  lidServo.write(90); // Open lid
  delay(3000);       // Keep it open for 3 seconds
  lidServo.write(0); // Close lid
}
Allow a little delay before the next reading.
delay(500); // Wait before next reading
How It All Works Together
- The ultrasonic sensor sends out a sound wave and measures how long it takes to bounce back.
- The Arduino calculates the distance to the object (your hand).
- If your hand is within 15 cm, the servo motor opens the lid for 3 seconds and then closes it.
- The process repeats continuously, making the garbage can "smart" and hands-free.
OBSERVING FUNCTIONALITY
- Normal Mode: The lid remains closed.
- Hand Detection: Place your hand near the sensor (within 15 cm), and the lid should open.
- Automatic Closing: After 3 seconds, the lid should close automatically.
COMMON PROBLEMS AND SOLUTIONS
1. Lid Not Moving:
- Check the servo wiring and connections.
- Ensure the servo is not overloaded (use MG996R for heavier lids).
2. Sensor Not Detecting Hand:
- Check if Trig and Echo pins are correctly connected.
- Verify the sensor is positioned correctly and unobstructed.
3. Lid Stays Open Constantly:
- Ensure the servo is receiving proper signals from the Arduino.
- Reduce delay time in the code if needed.
Conclusion
In conclusion, this tutorial has walked you through the process of building a Smart Garbage Can using an Arduino, an ultrasonic sensor, and a servo motor. By combining these components, you’ve created a hands-free system that automatically opens and closes the lid when it detects your hand nearby. This project not only introduces you to fundamental concepts like sensor input, motor control, and basic coding but also demonstrates how technology can solve everyday problems—like improving hygiene and convenience. Whether you’re a beginner or an experienced maker, this project is a great stepping stone to more advanced Arduino creations. Now that you’ve mastered the basics, feel free to experiment with customizations, such as adding lights, sound, or even integrating it with smart home systems. Happy tinkering!
Comments